The PI-Mobile, an autonomous car made with Lego, RaspberryPi and Deep Learning
I now work at Flaneer, feel free to reach out if you are interested!
When we started talking about this project with Matthias and then Arthur, we knew that both building a Lego motorized car, and learning to drive with real-life Deep Reinforcement Learning was possible. However, we wanted to do both at the same time. We also wanted to try another approach: Imitation Learning. We recently acquired a Raspberry Pi 4b and knew that the power limitations set by the previous model vanished. However, we didn’t know exactly how to fit everything into a lego car, and how to train it properly. We came up with 2 vehicles and used 2 methods of learning :
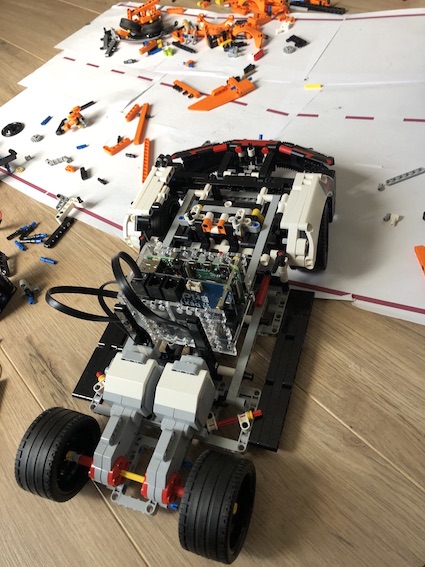
- a first model (that looks terrible), driving with a Deep Reinforcement Learning Agent
- a much better-looking car, driving with an Imitation Learning algorithm
The first one drove on an inside track built in my home, while the second drove outside.
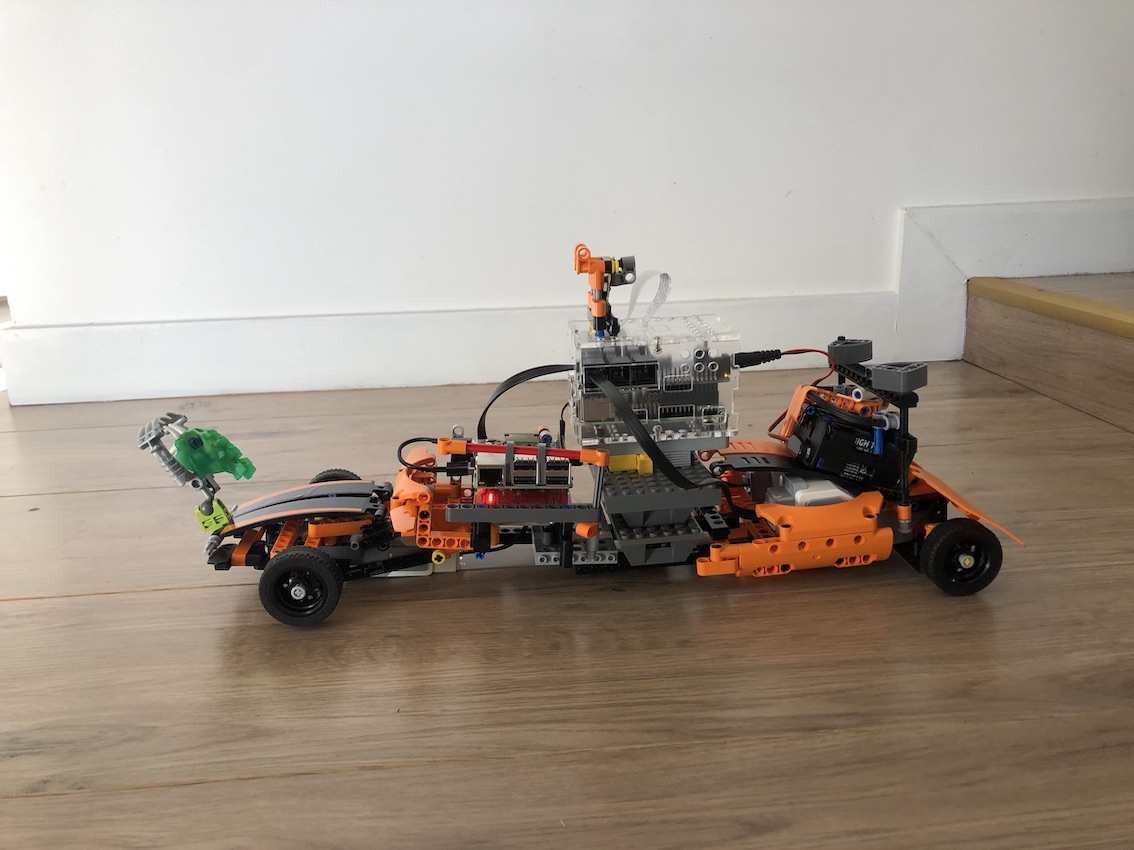
PI-Mobile V1
Assembling the car
The first step of building a lego car is building its structure and deciding the location of each component in the car to make it as compact as possible. We started by building each block and then assembled them. It resulted in a working car, but not in the fastest nor best-looking one.
The structure
We decided to choose a 3-engines solution: two at the back of the car that power each wheel separately, and one at the front powering the steering system that we built.

We chose to separate the car’s electronic system in two halves: one half is the core of the vehicle and will be linked to the motors, powering them, and will take care of the DRL part of the project. The second half is down the first part, as all the operations listed above are energy-consuming.
The core part consists of a Raspberry Pi 4b (we chose this device to be the center of all the operations because of its vast specifications compared to the Raspberry Pi 3b) and a card from Dexter Industries that manages the link with the lego technics. In contrast, the second part consists of a battery powering a Raspberry Pi 3 that powers a small fan, installed in between the two cards of the car’s core. While using a Raspberry Pi 3 to power a fan seems a bit of an overkill; it also allows us convenient a flexibility in programming, were we to decide to use a Master/slave architecture to compute the DRL part if the RP4 capped its power due to overheating.
We then used a raspbian image, unaltered, with the convenient package VNC Viewer, which allows us to access the raspbian of the PI via SSH protocol. From there, we can launch our script to make the car move.
We also used a raspberry camera on top of the car. This camera was the only input our car would use to drive around.
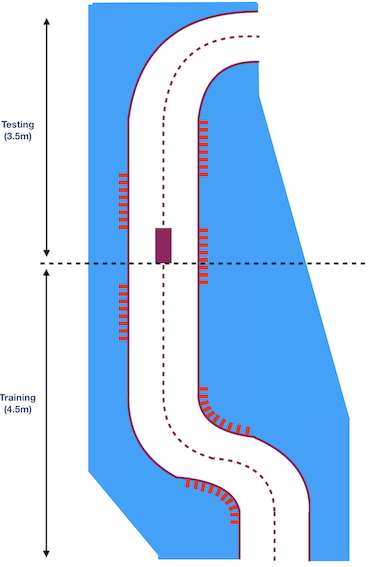
The track
The PI-Mobile V1 trained on a track we built inside my house. It is made of paper and is 8 meters long. However, it has a bridge in the middle, a bridge the car could never learn to pass properly (it struggled to go only forward because of a faulty steering system). Because of this, we split the track into 2 parts: a training part and a testing part :
The learning algorithm - DQL
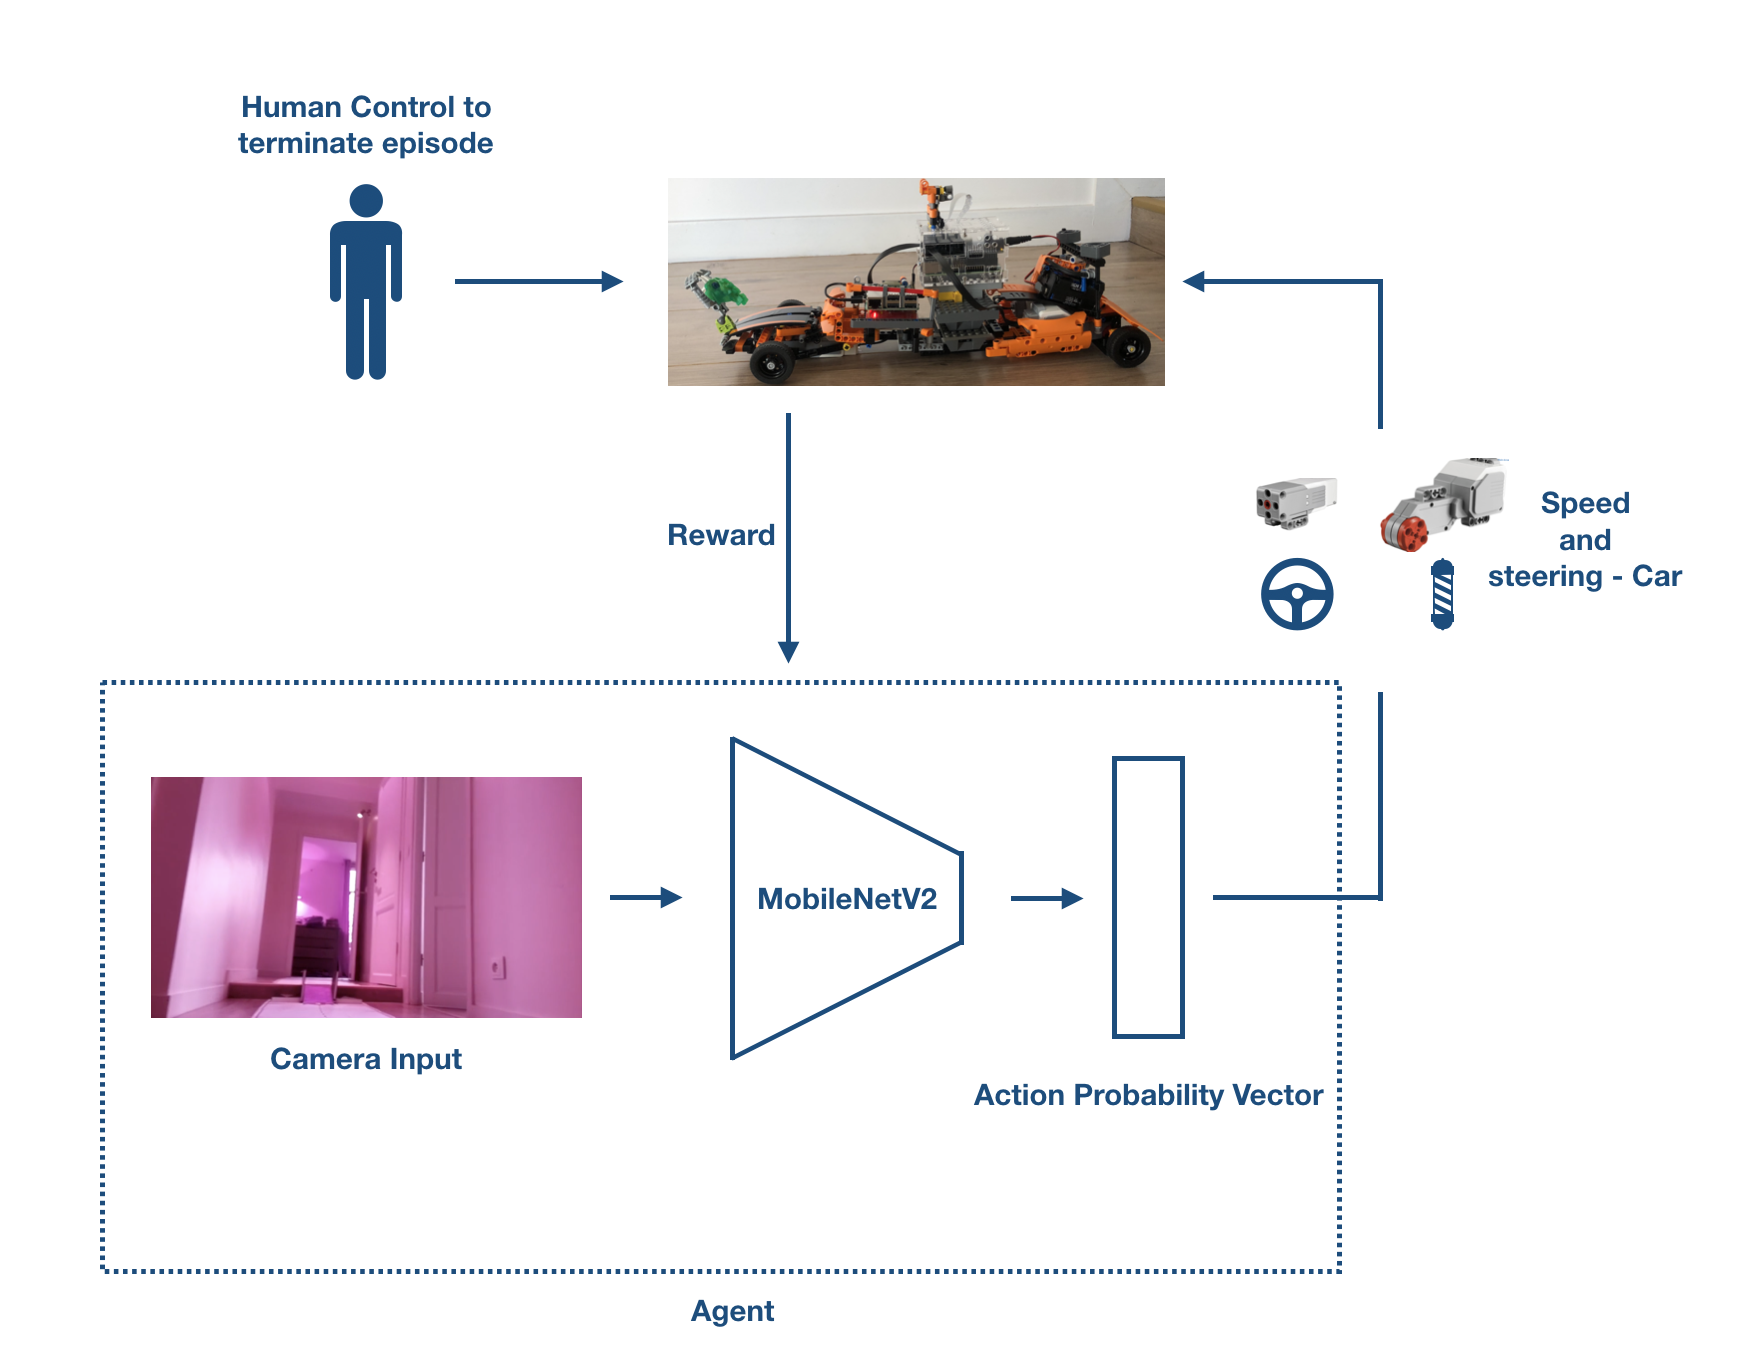
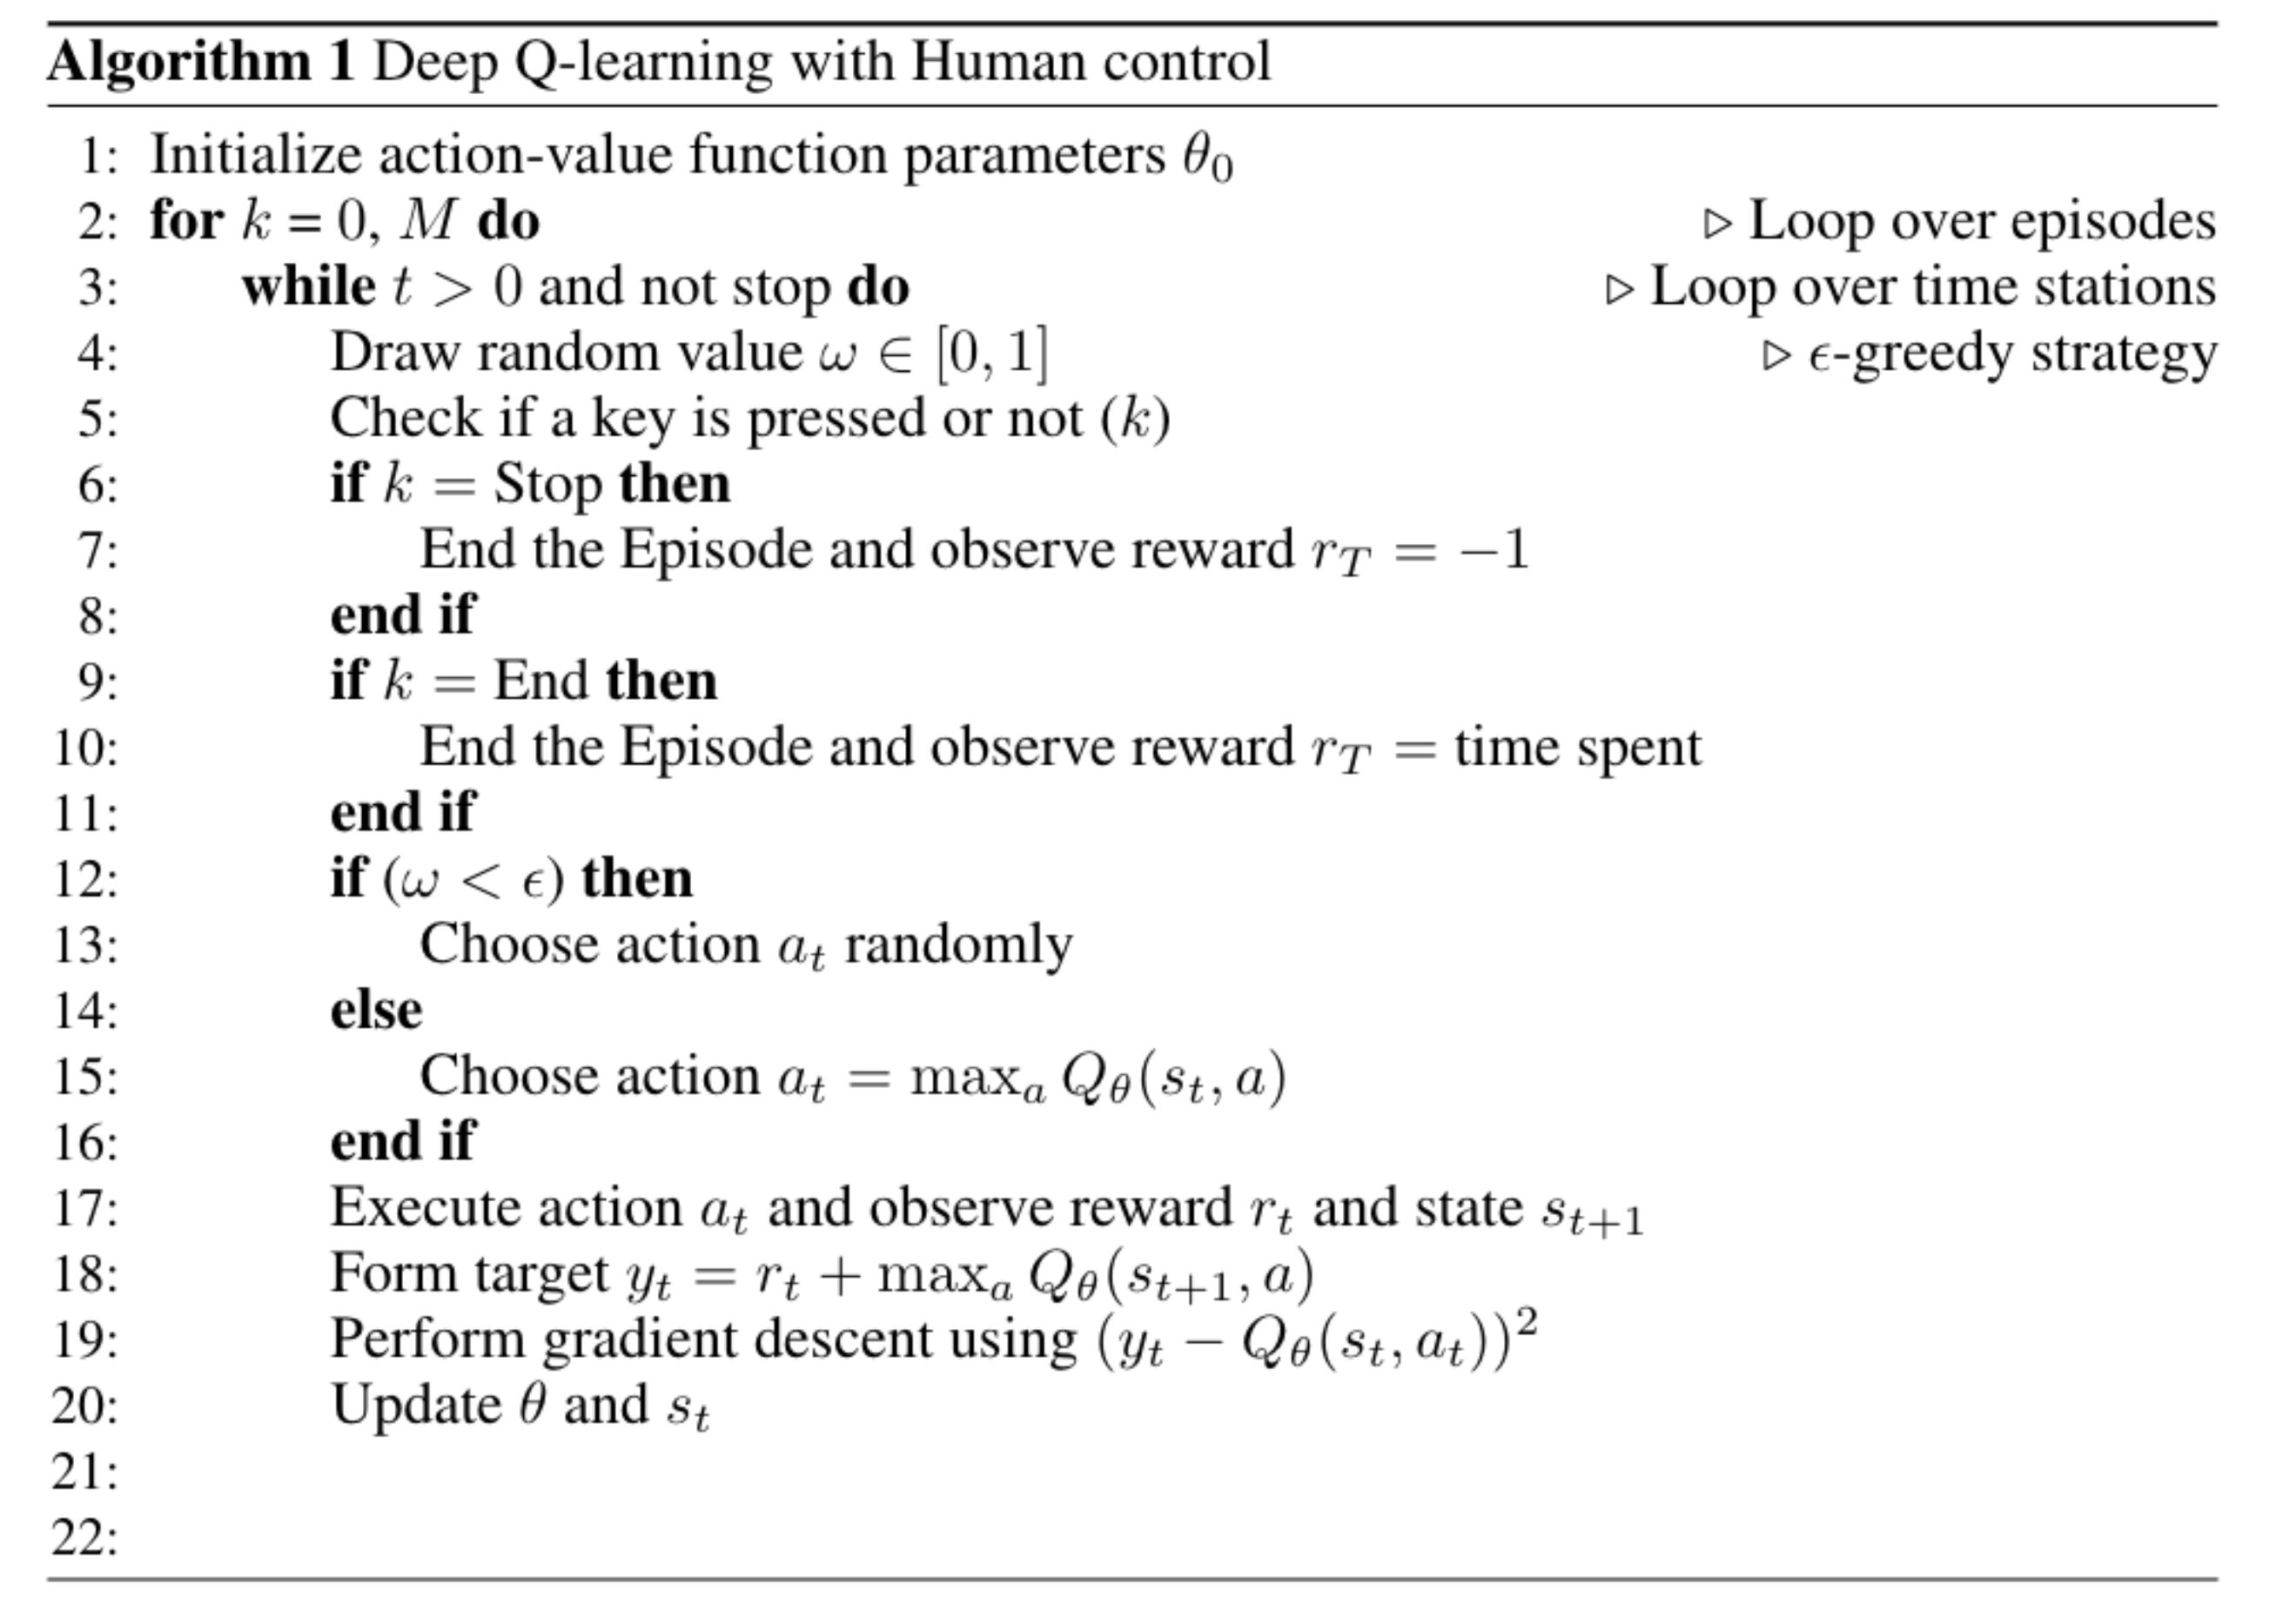
We used a Deep Q-learning agent to train our car to drive, with some minor modifications: human control. Since the agent is not interacting with a simulation but with the real world, we are the one telling it when to stop, or when it’s good or bad. We set up several keys: one to pause the current episode, one to finish it when the car is doing something bad, and finally, one to end the episode when the car reaches the end of the track. The algorithm is available below :
A more detailed explanation of Deep Reinforcement Learning is available on a previous blog post and paper.
Regarding the reward, we used a simple function: 1 at every step, except when the car fails (-1) or when it reaches the end of the trach (time spent on the track). The goal is to drive correctly and as fast as it could.
public double reward(String key, double time_since_start) {
    double reward = 0;

    if (key == stop) {
        reward = -1;
    } else if (key == end) {
        reward = (10. - time_since_start)/100.;
    } else {
        reward = 1;
    }

    return reward;
}
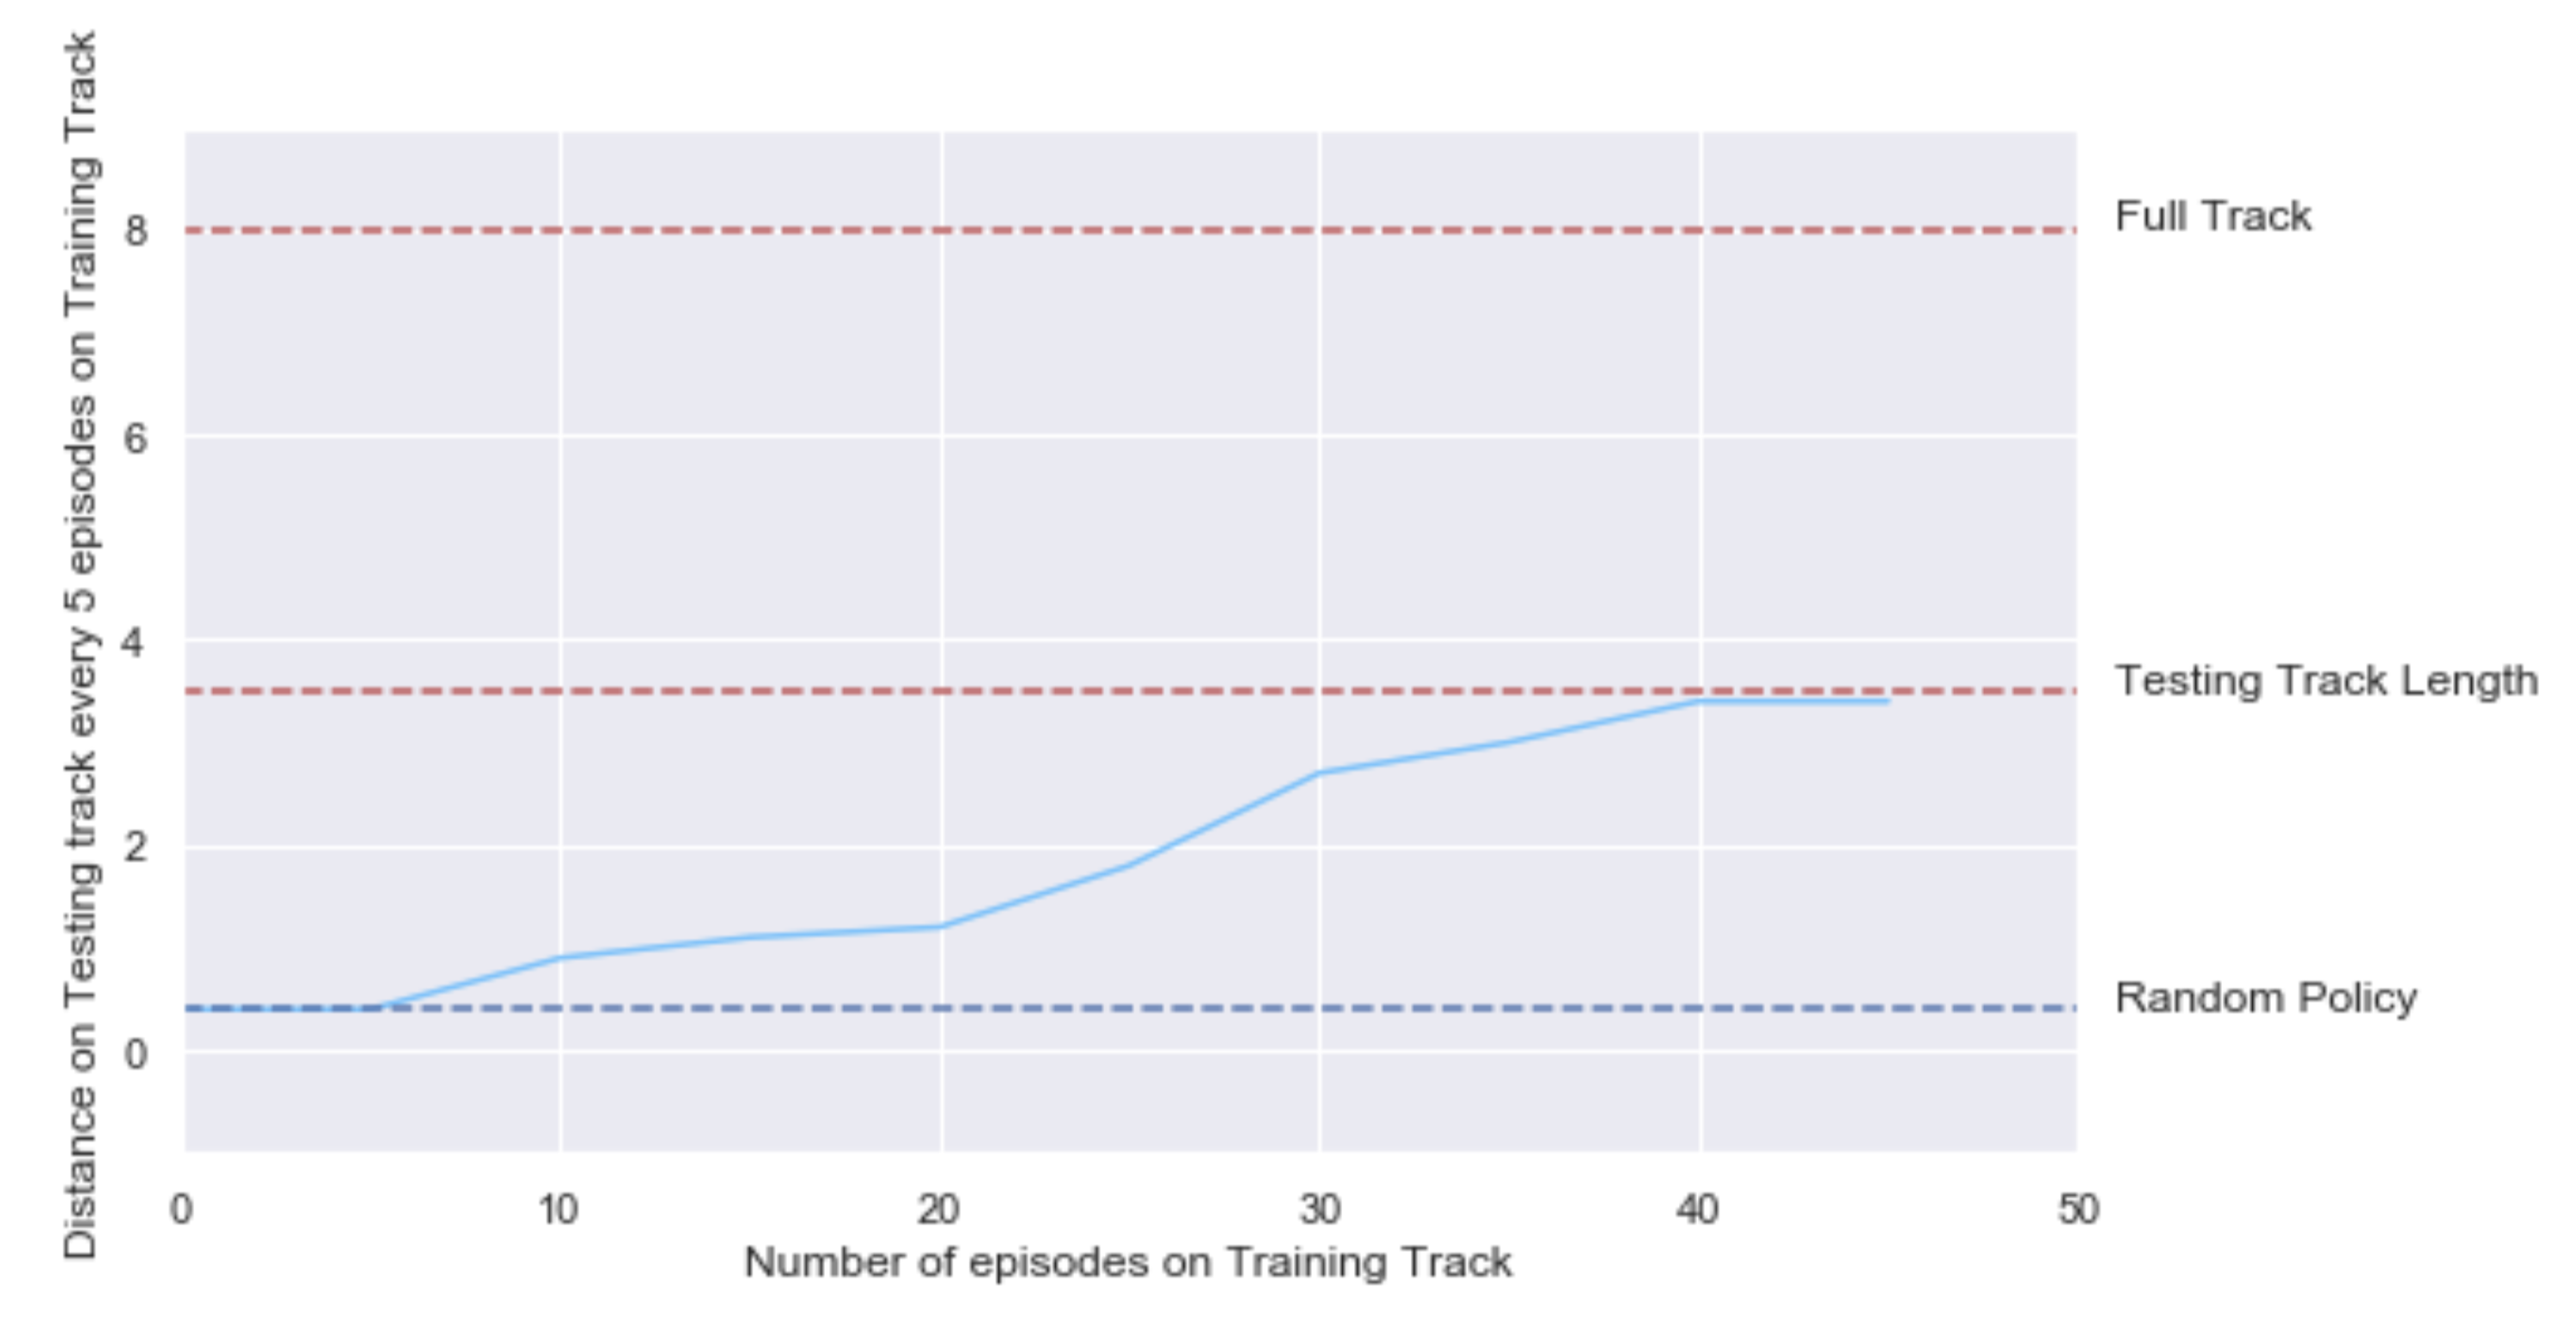
Overall, our car learned to drive on the testing track in less than 50 episodes (around an hour and a half). We tracked the distance made autonomously on the testing track every 5 training episodes :
An example of a training episode is available below :
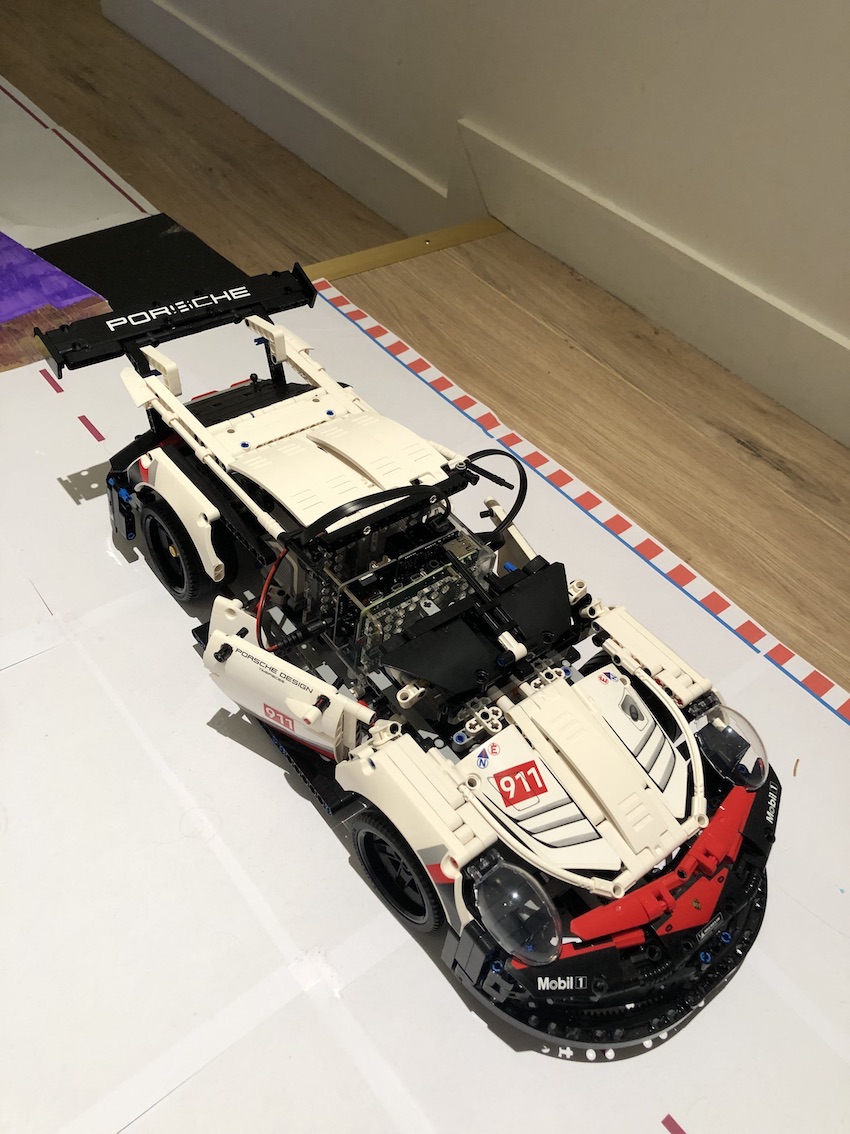
PI-Mobile V2
Now that we knew that our car could learn to drive on its own, we wanted to make some modifications:
| Car V1 | Modifications |
|---|---|
| Car's structure was not robust enough | Started from an existing Lego Technic car |
| The fan system was taking a lot of place | Remove the fan and the Raspberry 3 |
| The DRL agent was not necessarily the best solution | Use of an Imitation Learning algorithm |
| The track was too small | Train the car on a bigger track outside |
Structure
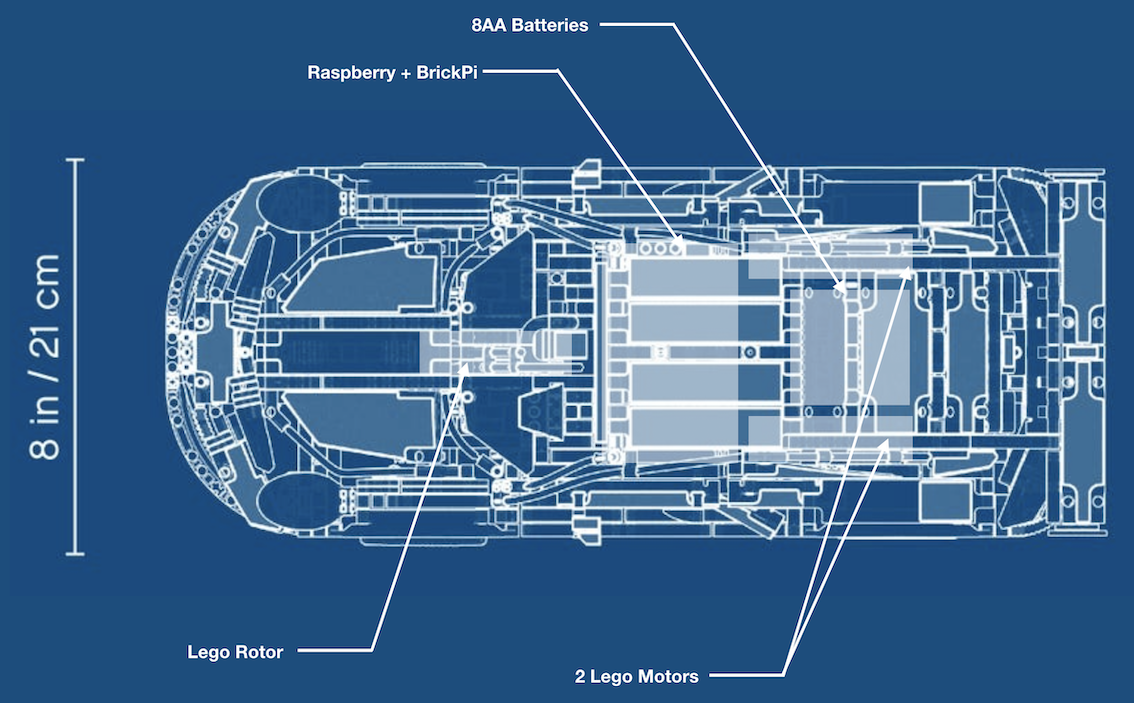
We kept the same main pieces (Raspberry Pi 4, BrickPi, and 3 motors) but changed the rest of the car. We used a Lego Technic Porsche 911 model as a base for the rest of the car.
Our goal was to use the following blueprint :
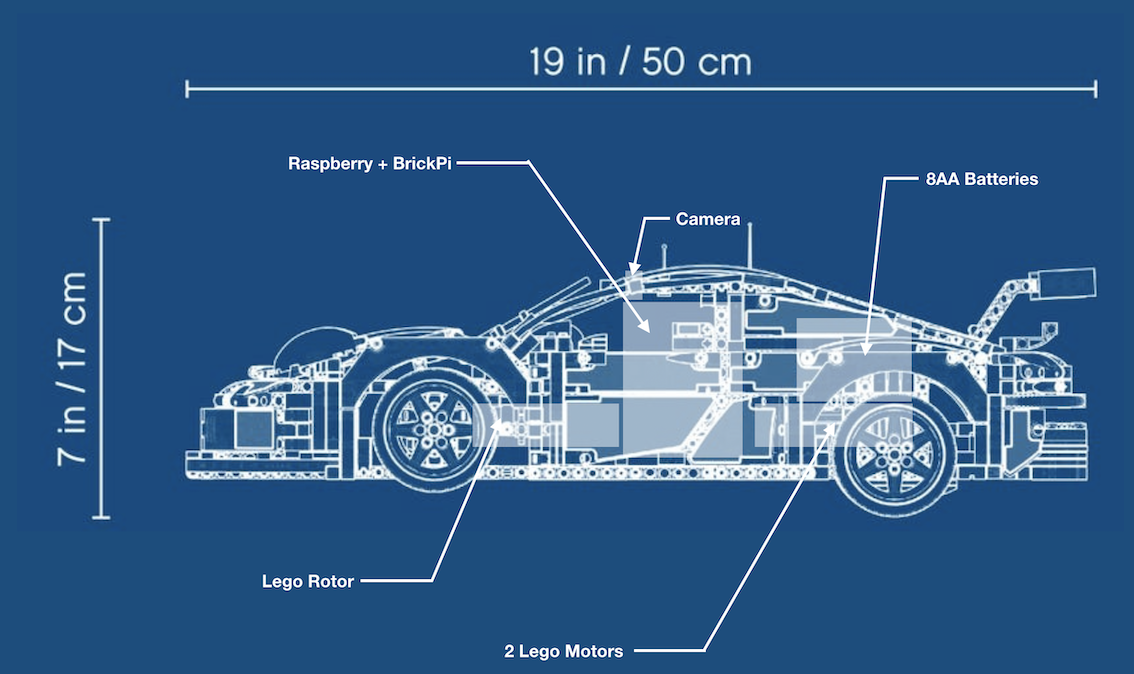
However, we had to make some modifications, mainly because of 2 things:
- The suspension system at the back of the car was not compatible with our Large motors
- The case used for the Raspberry Pi + BrickPi was not made for a Raspberry Pi 4, and therefore was not as robust as it should have been.
We removed the V6 engine and replaced it by the Raspberry Pi and the batteries. We also made some modifications to insert the Lego Rotor at the front, and the 2 Lego motors at the back. Using this as a baseline allows the car to be much more stable and with a more precise steering system. The first version also tended to break in the middle of the chassis; this doesn’t happen anymore.
The track
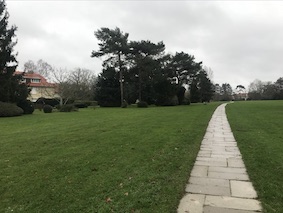
We wanted to be a bit more ambitious and step aside from the small inside track we used for the first car. We used a short pathway around the house as a circuit. This pathway lies inside a large garden, making it easy to define where the vehicle should drive and make a loop: precisely what we needed.
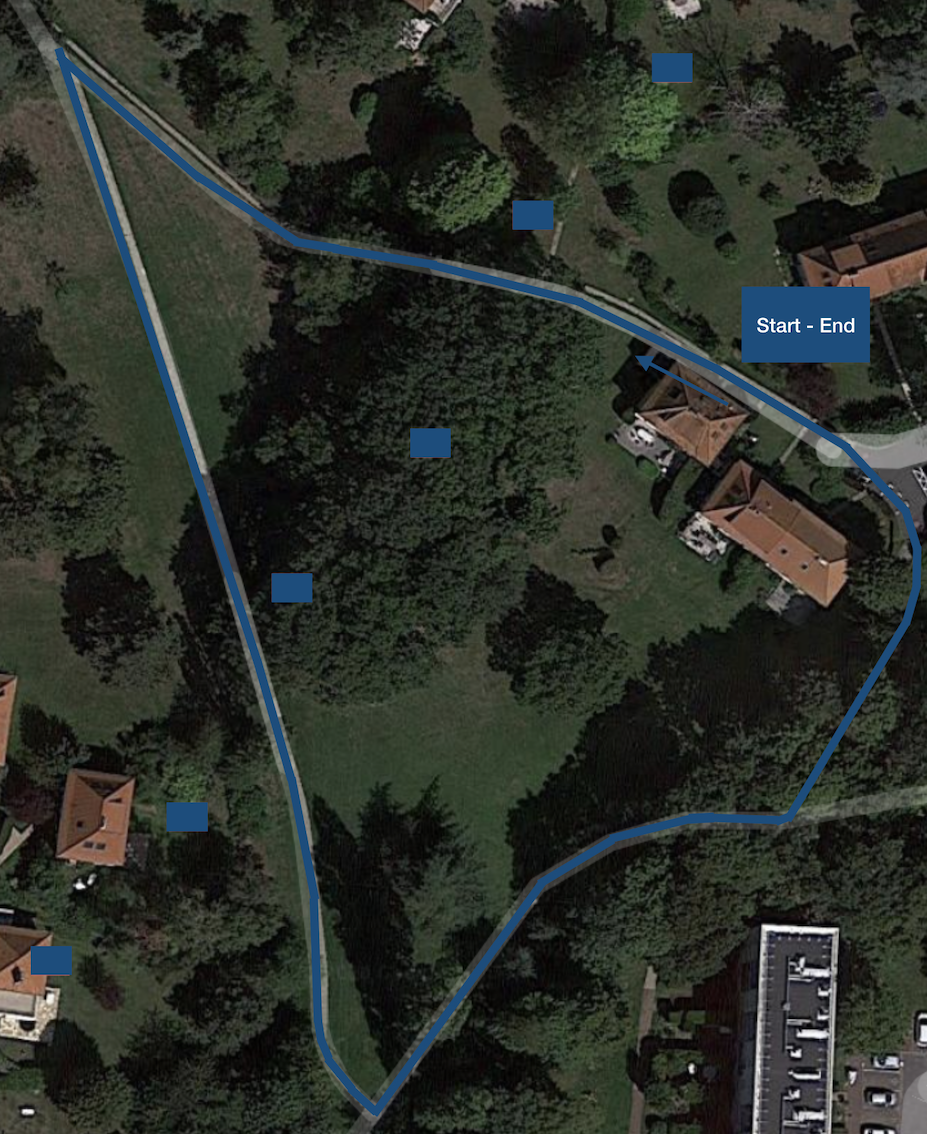
We would then use the rest of the pathway for testing our model. An example of such a pathway is available below :
Now that we have a new car and a new track, it is time to talk about the models we used to make our car autonomous.
Imitation Learning and Conditional Imitation Learning
Imitation Learning
Let $\mathcal{O}$ be the set of possible observations. In our case, it is the input from our camera. Let $\mathcal{A}$ the set of possible actions, here it could be turn left or right or go straight. Let’s suppose we have a dataset $\mathcal{D}$ made of observation-action pairs $(o_i,a_i)$, collected from our driving, for example.
The idea behind Imitation Learning is to learn a policy $\pi$ mapping observations to actions, $\pi _{\theta} : \mathcal{O} \rightarrow \mathcal{A}$. The policy would allow the car to know which actions to perform depending on the observation: the camera input, according to the driving we’ve done before.
The policy can then be trained by minimizing the distance between the policy $\pi _{\theta} (o_t)$ and the expert’s actions $a_t$. However, in some cases, the expert’s action is not enough. For example, our car might have the possibility to turn left or right in some cases, and we need to tell it what it should do: this is Conditional Imitation Learning.
Conditional Imitation Learning
The framework is the same as above, but we add a command $c_t$, expressing the expert’s intent when the policy is predicting an action to do. The mapping now takes the following form : $\pi _ {\theta} (o_t, c_t)$. The minimization process changes to
$\min\limits_{\theta} \displaystyle \sum_{t} \mathcal{L} (\pi _ {\theta} (o_t, c_t),a_t)$
Let’s now dive into the model we used and the dataset we collected :
Model & Dataset
Model
We kept the same neural network base, with a MobileNetV2 pretrained on ImageNet:

Dataset
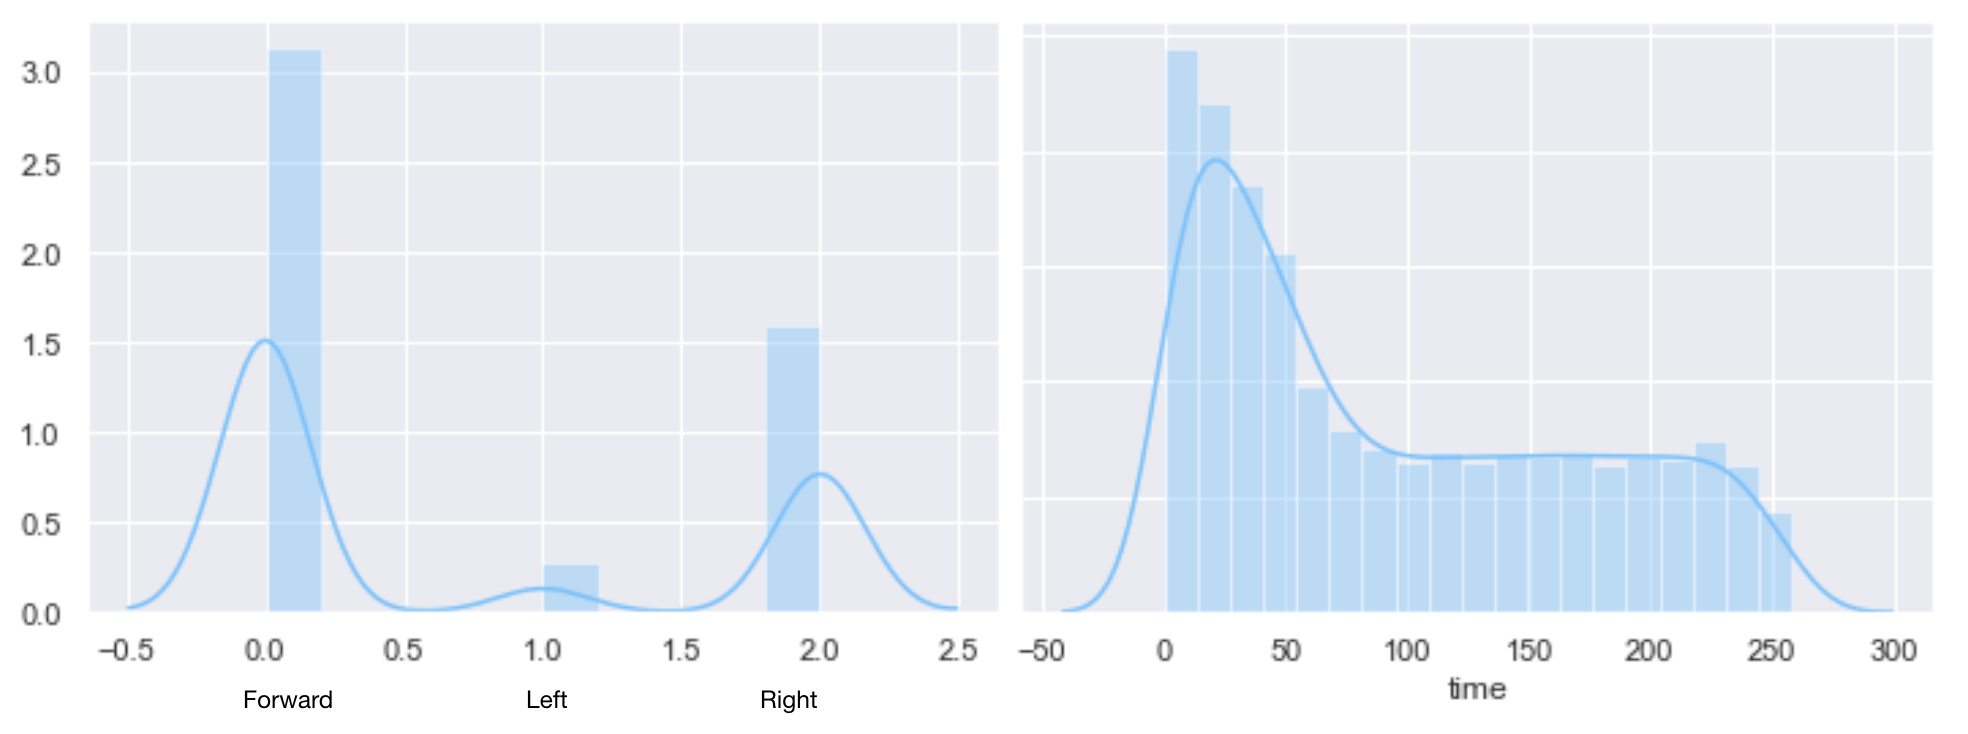
We drove the car for around 15 minutes on the track, gathering around 9000 frames with inputs and controls (the controls were added by hand afterward when 2 decisions were possible). We used 5000 frames for the training, 2000 for the validation, and 2000 for testing. However, because of another steering issue, the car was naturally going to the left when we were inputting a forward command. Therefore, most of the driving consisted of inputting forward and right to make sure the right would stay on track. Because of this, only a few left inputs were issued, mostly for significant turns. This can be seen below. We also split the dataset into smaller episodes to make sure that the Raspberry stoping itself would not delete a file too large.
We trained the model twice: once without data augmentation and once by including it. The data augmentation consisted of adding some random modifications regarding:
- Brightness
- Small rotation
- Small height and width translations
The model without data augmentation gave poor results, especially during our first test session, where the time of day and weather were completely different. This emphasizes the fact that the training dataset must generalize to real-world testing: different weather, different lighting and different road style. This data augmentations made the car going from a complete failure to an acceptable robot.
Overall, we should have made a better dataset, mainly making sure we had no steering issues. This made the testing difficult, forcing us to add artificial left steering and to make the car starts with the same proper angle as in the dataset.
Results
Nevertheless, we achieved good results with the augmented dataset. The predictions made by the model on the testing dataset are available below :
We also tested the car on another portion of the track, although with similar weather conditions from the training dataset :
Conclusion :
Overall, it was an extremely fun project to do, and more importantly, did not require a lot of sophisticated knowledge. The car can be built with Legos, the motor, and the BrickPi from Dexter Industry is easy to use with Python. Furthermore, the Deep Learning algorithms we used can be found anywhere. It was actually exciting to see how we could put every “tech brick” one after another, and end up with a working self-driving car. Granted, following a track and making a few turns is far away from the demanding needs of a real autonomous car, interacting with others, but the basics of driving can still be learned with simple components.
References :
- Learning to Drive in a day - Wayve
- Urban Driving with Conditional Imitation Learning - Wayve
- End-to-end Driving via Conditional Imitation Learning - Codevilla et al.